
Run a Centos Lamp development server on XP, Vista or Win 7 using VirtualBox
If you use a Windows based workstation or notebook computer virtualization offers a way for you to run a linux server environment using the same linux distribution and configuration you'll use in production. Virtualization allows you to explore clustering and network setups that can't be tested on your workstation alone and simplifies your development environment by keeping the LAMP environment contained inside a VM.
While VMWare offers these capabilities with their VMWare workstation product, Sun has created a free alternative called VirtualBox, with many of the same capabilities in VMWare workstation. VirtualBox runs on a variety of intel chip based operating systems including OS/X, Windows XP & Vista, Linux and Solaris, and supports the installation of many different "Guest" operating systems. In this article, I'll detail the installation and configuration of Centos. Centos is a great choice for a Linux server operating system, as it is widely used by hosting companies due to its Redhat Enterprise Linux (RHEL) core.
Our goals in this setup will be:
• Centos server running the LAMP stack
• XP can be used to develop code using the IDE of your choice.
• The XP Workstation can communicate with the linux server using standard tools: putty, winscp, firefox
• The setup works even when no other networking is available. When a network is available, no network reconfiguration is required.
• Use XP to setup private domain resolution so apache vhost configurations can be tested.
Let's get started.
Preparations
You will need the VirtualBox installation program, as well as the CD or DVD images for Centos 5 available on your workstation. If you plan to download the .iso file(s) you will want to do this in advance, as it could take many hours to download, depending on the speed of your internet connection, and the load on the available Centos mirrors. You might want to bookmark this article in advance. Section 1 & 2 below will cover these steps.
Download and install VirtualBox for Windows
Go to the VirtualBox site and run the installtion.
Install the Microsoft Loopback Adapter
This is covered very well on microsoft's sight and in articles like this one. We'll utilize the loopback adapter later, to allow XP to communicate with Centos.
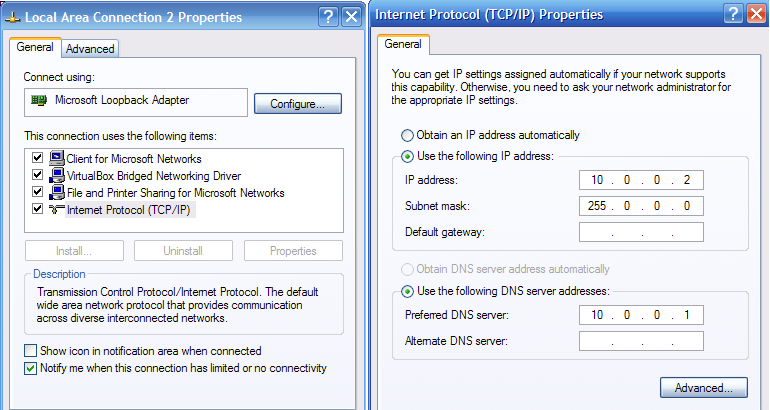
Once the adapter is installed, go to the control panel | Network Connections, find the newly added "loopback adapter" connection and right-click and open the properties. If need be, add the VirtualBox Bridged Networking driver. Then give the adapter an IP address on the 10.0.0.x network.
Download or copy from CD/DvD the latest Centos 5 .iso images
In this article, I downloaded and installed the 386 version, but it's worth noting that if you have a 64 bit machine, it's possible to run 64bit guests with VirtualBox, which might be advantageous, especially if your servers will be 64 bit. Keep in mind that the goal is to match the production server environment as closely as possible. If you do plan to go 64bit, there's a nice summary of requirements and gotchas at this Start64.com article on VirtualBox.
The simplest solution is probably to get the Centos 5 DVD iso, however, I haven't tested this personally. As our goal initially is to install the most minimal server possible, you will only need the first Centos ISO cd. If you already have CD's or DVD's for Centos, you can use them to install Centos, by mounting your workstation's CD/DVD drive in your VirtualBox Guest configuration. I won't explain that in detail, but it's in the same configuration area we'll use to mount our .iso image as a virtual Read only device.
Links to the Centos 5 Iso files are here. Download the i386 iso's if you have a 32 bit machine/OS, and the x86_64 if you have a 64 bit machine and OS. You can also try the .torrent files, if you have a bit torrent client you prefer.
The only iso we'll need in this example is the CentOS-5.3-i386-bin-1of6.iso.
Download and install Putty
Putty is a free ssh client for Windows. We'll use this to ssh into the Centos server from windows. Download Putty here and install it.
VirtualBox Installation and Configuration
Section 4 - VirtualBox setup
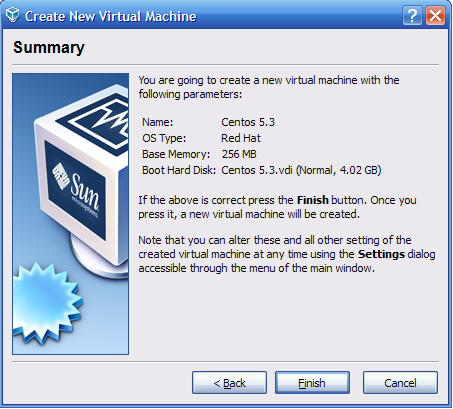
Start up VirtualBox and click up the "New" button to start the New Virtual Machine Wizard.
• Give it whatever name you like. In this case I've named it Centos 5.3.
• Set Operating System: Linux
• Version: Red Hat
Click Next
Leave Memory at 256 MB
Virtual Hard Disk, Create New Hard Disk
Click Next 2x to start the Virtual Hard Disk Wizard
For Hard Disk Storage Type, change this to Fixed Size Storage
You can leave the default size of 8gb.
Click Finish -- to start the creation of the virtual hard disk file.
When complete, click Next 2x and accept the settings.
Your settings should look something like this:
Mounting the cd-rom Image
Now that you have a Guest VM configuration saved, click to select it, and click the large yellow Settings button
When the settings Dialog opens, click on the CD/DVD-ROM Menu choice.
Click on the ISO Image file radio button and then the folder icon next to it as shown below.
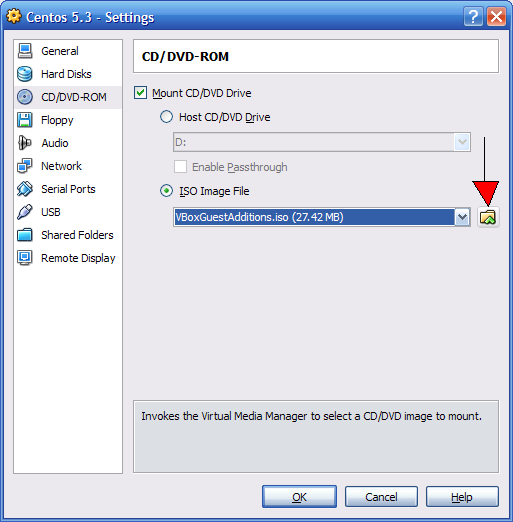
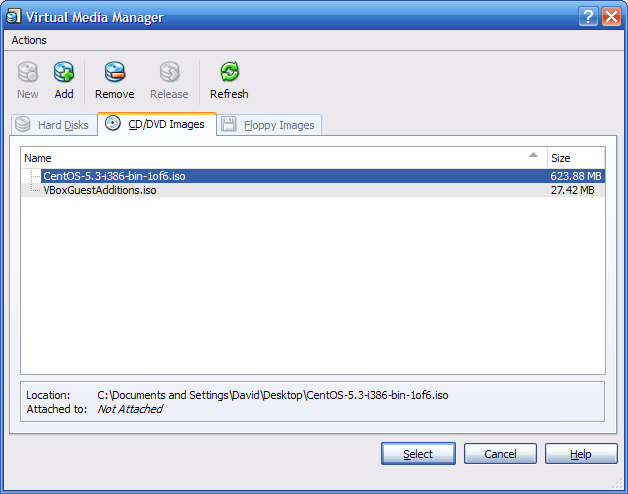
This will bring up the Virtual Media Manager.
Click the Add button and select the CentOS-5.3-i386-bin-1of6.iso file you downloaded earlier. The Virtual Media Manager will create a virtual CD Device that can be mounted and unmounted. Select it to mount the iso in the VM.
Add 2nd Guest Network Adapter
Use the Network Settings, and Add a 2nd network Adapter. Both Adapters should be set to utilize NAT.
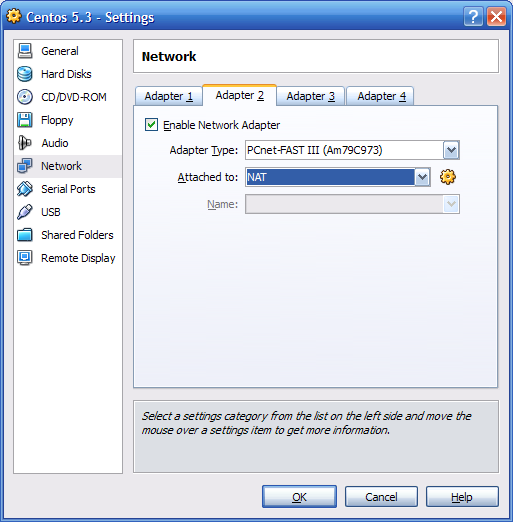
Click OK, and Start your New VM, to begin the Centos Installation.
Installing a minimal Centos
If everything goes as plan, the VM will boot, and you'll come to the Centos installation screen.
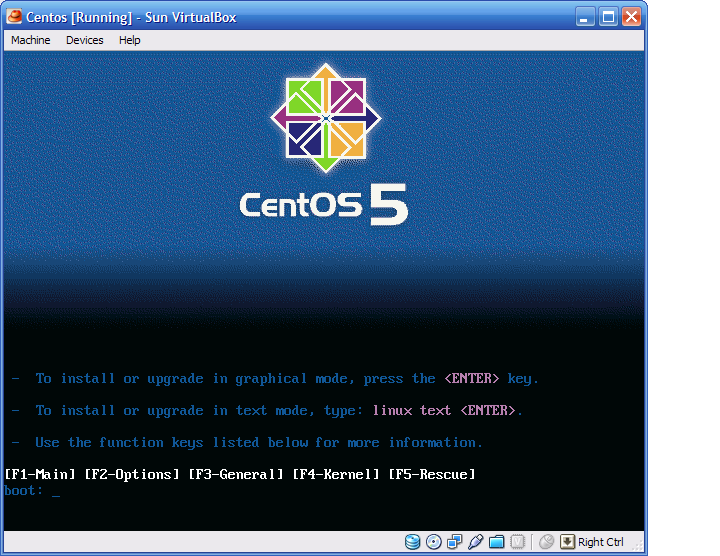
At the prompt type: linux text to initiate the text based installer. The installer uses the arrow keys or tab to move between selections and enter to select a choice.
• At CD Found prompt, choose to Skip the media test.
• Choose your language preference
• Allow Centos to create the partitions using the default layout.
• Accept the defaults for networking and set a root password
• At the Package selection screen, unselect (with the spacebar) all the packages, and choose the "Customize software selection".
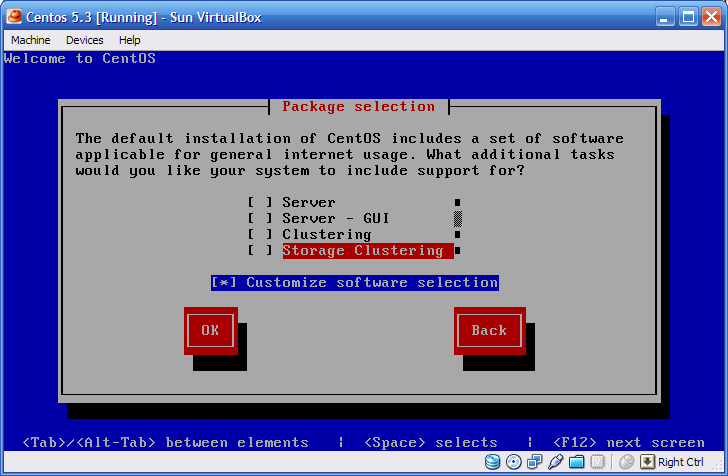
• From the package selection screen, unselect ALL packages except for the "Base" package.
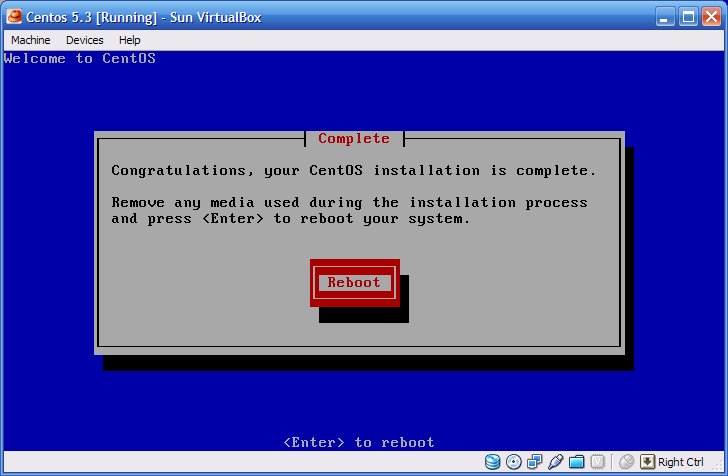
Click OK, and Centos installation should proceed without the need for intervention. If all goes as planned, you'll now have a Centos installation ready to boot:
Booting Centos for the First Time
The first time you boot, Centos will run the Setup Assistant. You can use it to accomplish the following two configuration tweaks:
• Disable selinux
• Turn off the Linux firewall (iptables)
These can both be accomplished in other ways, so you don't have to use the assistant, but I won't cover that here. To use the setup assistant, you should use the firewall menu to configure things like so:

Accept these choices and exist the Setup Assistant. Once you see the login prompt, login as the root user using the password you specified during setup.
Setting up Centos
Once Centos has booted, check to see whether or not the network layer has initialized properly.
ifconfig
You should see something very similar to this. The important things to note are that eth0 has an inet addr in the 10.x
eth0 Link encap:Ethernet HWaddr 08:00:27:FD:AE:83
inet addr:10.0.2.15 Bcast:10.0.2.255 Mask:255.255.255.0
inet6 addr: fe80::a00:27ff:fefd:ae83/64 Scope:Link
UP BROADCAST RUNNING MULTICAST MTU:1500 Metric:1
RX packets:11 errors:0 dropped:0 overruns:0 frame:0
TX packets:88 errors:0 dropped:0 overruns:0 carrier:0
collisions:0 txqueuelen:1000
RX bytes:1973 (1.9 KiB) TX bytes:19037 (18.5 KiB)
Interrupt:11 Base address:0xc020
eth1 Link encap:Ethernet HWaddr 08:00:27:D1:B4:D6
inet addr:10.0.3.15 Bcast:10.0.3.255 Mask:255.255.255.0
inet6 addr: fe80::a00:27ff:fed1:b4d6/64 Scope:Link
UP BROADCAST RUNNING MULTICAST MTU:1500 Metric:1
RX packets:36898 errors:0 dropped:0 overruns:0 frame:0
TX packets:20160 errors:0 dropped:0 overruns:0 carrier:0
collisions:0 txqueuelen:1000
RX bytes:54766848 (52.2 MiB) TX bytes:1136613 (1.0 MiB)
Interrupt:10 Base address:0xc240
lo Link encap:Local Loopback
inet addr:127.0.0.1 Mask:255.0.0.0
inet6 addr: ::1/128 Scope:Host
UP LOOPBACK RUNNING MTU:16436 Metric:1
RX packets:8 errors:0 dropped:0 overruns:0 frame:0
TX packets:8 errors:0 dropped:0 overruns:0 carrier:0
collisions:0 txqueuelen:0
RX bytes:560 (560.0 b) TX bytes:560 (560.0 b)
The first thing you want to do is insure that your VM is capable of reaching the Internet using NAT. This depends on having an active internet connection on your workstation. To verify things are working, ping a well known website (I use www.yahoo.com).
ping -c 10 www.yahoo.com
After a few seconds you should see the results of the ping, indicating that you can successfully ping yahoo.
PING www-real.wa1.b.yahoo.com (209.131.36.158) 56(84) bytes of data.
64 bytes from f1.www.vip.sp1.yahoo.com (209.131.36.158): icmp_seq=1 ttl=57 time=23.4 ms
64 bytes from f1.www.vip.sp1.yahoo.com (209.131.36.158): icmp_seq=2 ttl=57 time=22.6 ms
64 bytes from f1.www.vip.sp1.yahoo.com (209.131.36.158): icmp_seq=3 ttl=57 time=39.5 ms
64 bytes from f1.www.vip.sp1.yahoo.com (209.131.36.158): icmp_seq=4 ttl=57 time=22.4 ms
64 bytes from f1.www.vip.sp1.yahoo.com (209.131.36.158): icmp_seq=5 ttl=57 time=27.2 ms
64 bytes from f1.www.vip.sp1.yahoo.com (209.131.36.158): icmp_seq=6 ttl=57 time=20.8 ms
64 bytes from f1.www.vip.sp1.yahoo.com (209.131.36.158): icmp_seq=7 ttl=57 time=26.9 ms
64 bytes from f1.www.vip.sp1.yahoo.com (209.131.36.158): icmp_seq=8 ttl=57 time=26.5 ms
64 bytes from f1.www.vip.sp1.yahoo.com (209.131.36.158): icmp_seq=9 ttl=57 time=26.8 ms
64 bytes from f1.www.vip.sp1.yahoo.com (209.131.36.158): icmp_seq=10 ttl=57 time=32.2 ms
--- www-real.wa1.b.yahoo.com ping statistics ---
10 packets transmitted, 10 received, 0% packet loss, time 13049ms
rtt min/avg/max/mdev = 20.894/26.877/39.573/5.244 ms
Update to the latest packages using the Centos Yum package manager
Yum will connect to Centos repositories and determine what needs to be updated automatically.
yum update
This may take a while, depending on your internet connection. Yum will check the list of installed packages and download and install any required updates. When I wrote this article, there were 35 updates and 1 new package installation required. When prompted type 'Y'.
Once the packages are downloaded, type Y to perform the updates.
You should see a list of updated packages and the word "Complete" when everything is up to date.
Configure eth0 so that you can connect from Windows to your Centos server
Now we'll reconfigure the eth0 device so that you can connect via the windows loopback adapter.
The scripts that setup the network are named ifcfg-. We'll edit the ifcfg-eth0 file and give it a static IP address.
cd /etc/sysconfig/network-scripts
nano ifcfg-eth0
nano is a wysiwig editor where you can use the arrow keys to move around. Make the following edits so that the ifcfg-eth0 file looks like this (Note: you should not change the HWADDR):
# Advanced Micro Devices [AMD] 79c970 [PCnet32 LANCE]
DEVICE=eth0
HWADDR=08:00:27:fd:ae:83
ONBOOT=yes
#BOOTPROTO=dhcp
BOOTPROTO=static
IPADDR=10.0.0.3
TYPE=Ethernet
When you're done with these edits, type Ctrl-o to save out the changes, and ctrl-x to exit.
Now you need to shutdown your Centos VM, in order to reconfigure the Guest VM networking.
shutdown -h now
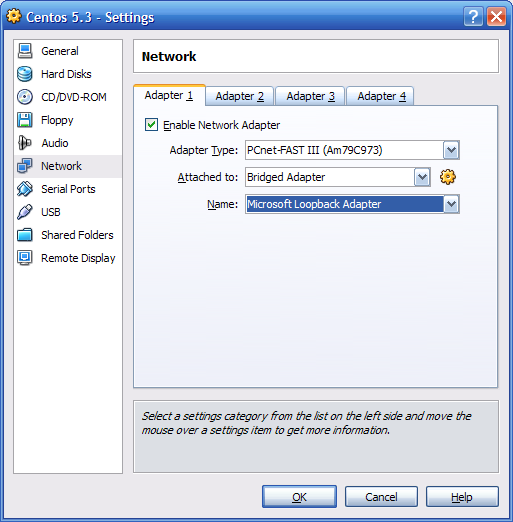
When the VM is shutdown, Virtualbox will allow you to modify the Settings. Click the Settings button to open the Settings dialog again, and then click the Network menu, so you can modify Adapter 1, which is associated with eth0.
Modify the Attached To: and change this from NAT to Bridged Adapter. Once you've changed this, the name: drop down will appear and you'll be able to specify the XP network adapter to bridge to, which we'll change to be the Microsoft Loopback Adapter. If you recall, we previously configured the loopback adapter so that it has a 10.0.0.2 IP. The configuration should look like this:
Once Centos reboots, verify that the eth0 settings are now in place:
ifconfig eth0
[root@localhost ~]# ifconfig eth0
eth0 Link encap:Ethernet HWaddr 08:00:27:FD:AE:83
inet addr:10.0.0.3 Bcast:10.255.255.255 Mask:255.0.0.0
inet6 addr: fe80::a00:27ff:fefd:ae83/64 Scope:Link
UP BROADCAST RUNNING MULTICAST MTU:1500 Metric:1
RX packets:61 errors:0 dropped:0 overruns:0 frame:0
TX packets:115 errors:0 dropped:0 overruns:0 carrier:0
collisions:0 txqueuelen:1000
RX bytes:6961 (6.7 KiB) TX bytes:17422 (17.0 KiB)
Interrupt:11 Base address:0xc020
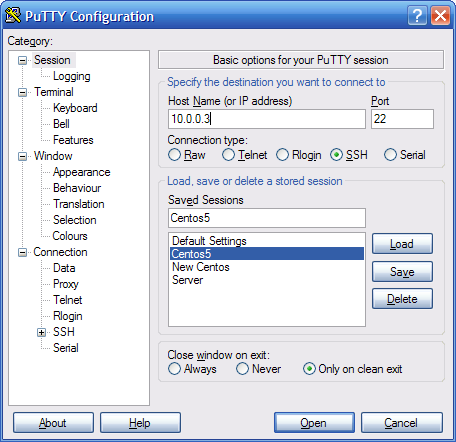
Now we should be able to use putty to ssh into our Centos server from windows using Putty. Start putty and put in 10.0.0.3 as the host address. It's probably a good idea to give the Session a name and save it so that you don't have to type in the 10.0.0.3 address every time you want to connect.
The first time you connect with Putty, you'll be prompted to save the ssh key for the server. Accept this so you won't be prompted in the future.
Login as root and you'll have full control of the server. Another helpful windows program is winscp, which you can use to move files back and forth between windows and your centos server.
Installing Apache, MySQL and PHP
We'll use the yum package manager to install the packages I typically use on a lamp development server.
*NOTE: Check out part 2 of this series if you want a recent version of PHP and MySQL!*
yum install httpd
yum install mysql
yum install mysql-server
yum install php
yum install php-mysql php-pdo php-pear php-gd
After installing these packages, we should be able to start apache and mysql, and verify that our php configuration is working.
service mysql start
The first time you start mysql, the package will do some initialization and provide you information on how to set the root mysql user password.
[root@localhost ~]# service mysqld start
Initializing MySQL database: Installing MySQL system tables...
OK
Filling help tables...
OK
To start mysqld at boot time you have to copy
support-files/mysql.server to the right place for your system
PLEASE REMEMBER TO SET A PASSWORD FOR THE MySQL root USER !
To do so, start the server, then issue the following commands:
/usr/bin/mysqladmin -u root password 'new-password'
/usr/bin/mysqladmin -u root -h localhost password 'new-password'
See the manual for more instructions.
You can start the MySQL daemon with:
cd /usr ; /usr/bin/mysqld_safe &
You can test the MySQL daemon with mysql-test-run.pl
cd mysql-test ; perl mysql-test-run.pl
Please report any problems with the /usr/bin/mysqlbug script!
The latest information about MySQL is available on the web at
http://www.mysql.com
Support MySQL by buying support/licenses at http://shop.mysql.com
[ OK ]
Starting MySQL: [ OK ]
[root@localhost ~]#
Now start Apache.
service httpd start
[root@localhost ~]# service httpd start
Starting httpd: httpd: Could not reliably determine the server's fully qualified domain name, using 127.0.0.1 for ServerName
[ OK ]
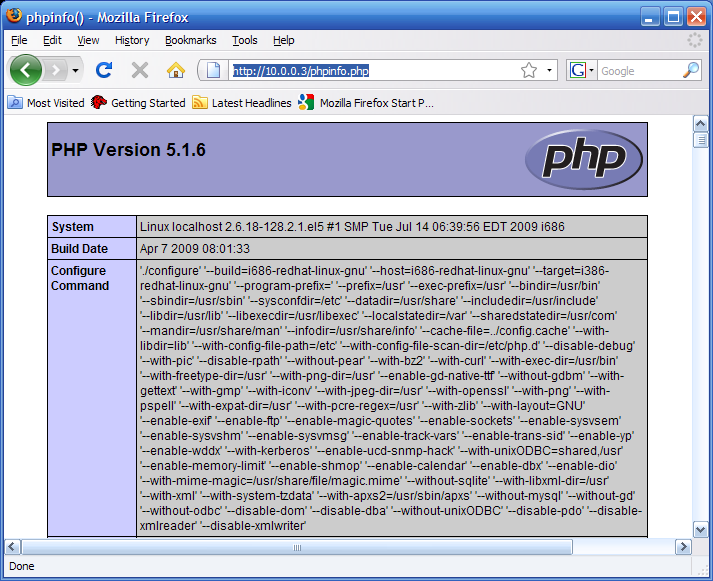
To conclude, let's add a simple phpinfo.php page and connect to it from a browser on windows.
cd /var/www/html
nano phpinfo.php
When nano opens type this php script, and save the file using ctrl-o to write it out, and ctrl-x to exit.
Open your browser of choice on your workstation, and point the url to http://10.0.0.3/phpinfo.php. You should be able to run the script and verify your php configuration.
In the next article, I'll outline further refinements to the setup, including configuring an apache vhost, adding to the hosts file under windows so that you can use domain names instead of IP addresses, and updating to newer versions of php and mysql, as well as the helpful php xdebug extension.
*Part II of the series here*
ifconfig
eth0 Link encap:Ethernet HWaddr 08:00:27:FD:AE:83
inet addr:10.0.2.15 Bcast:10.0.2.255 Mask:255.255.255.0
inet6 addr: fe80::a00:27ff:fefd:ae83/64 Scope:Link
UP BROADCAST RUNNING MULTICAST MTU:1500 Metric:1
RX packets:11 errors:0 dropped:0 overruns:0 frame:0
TX packets:88 errors:0 dropped:0 overruns:0 carrier:0
collisions:0 txqueuelen:1000
RX bytes:1973 (1.9 KiB) TX bytes:19037 (18.5 KiB)
Interrupt:11 Base address:0xc020
eth1 Link encap:Ethernet HWaddr 08:00:27:D1:B4:D6
inet addr:10.0.3.15 Bcast:10.0.3.255 Mask:255.255.255.0
inet6 addr: fe80::a00:27ff:fed1:b4d6/64 Scope:Link
UP BROADCAST RUNNING MULTICAST MTU:1500 Metric:1
RX packets:36898 errors:0 dropped:0 overruns:0 frame:0
TX packets:20160 errors:0 dropped:0 overruns:0 carrier:0
collisions:0 txqueuelen:1000
RX bytes:54766848 (52.2 MiB) TX bytes:1136613 (1.0 MiB)
Interrupt:10 Base address:0xc240
lo Link encap:Local Loopback
inet addr:127.0.0.1 Mask:255.0.0.0
inet6 addr: ::1/128 Scope:Host
UP LOOPBACK RUNNING MTU:16436 Metric:1
RX packets:8 errors:0 dropped:0 overruns:0 frame:0
TX packets:8 errors:0 dropped:0 overruns:0 carrier:0
collisions:0 txqueuelen:0
RX bytes:560 (560.0 b) TX bytes:560 (560.0 b)
ping -c 10 www.yahoo.com
PING www-real.wa1.b.yahoo.com (209.131.36.158) 56(84) bytes of data.
64 bytes from f1.www.vip.sp1.yahoo.com (209.131.36.158): icmp_seq=1 ttl=57 time=23.4 ms
64 bytes from f1.www.vip.sp1.yahoo.com (209.131.36.158): icmp_seq=2 ttl=57 time=22.6 ms
64 bytes from f1.www.vip.sp1.yahoo.com (209.131.36.158): icmp_seq=3 ttl=57 time=39.5 ms
64 bytes from f1.www.vip.sp1.yahoo.com (209.131.36.158): icmp_seq=4 ttl=57 time=22.4 ms
64 bytes from f1.www.vip.sp1.yahoo.com (209.131.36.158): icmp_seq=5 ttl=57 time=27.2 ms
64 bytes from f1.www.vip.sp1.yahoo.com (209.131.36.158): icmp_seq=6 ttl=57 time=20.8 ms
64 bytes from f1.www.vip.sp1.yahoo.com (209.131.36.158): icmp_seq=7 ttl=57 time=26.9 ms
64 bytes from f1.www.vip.sp1.yahoo.com (209.131.36.158): icmp_seq=8 ttl=57 time=26.5 ms
64 bytes from f1.www.vip.sp1.yahoo.com (209.131.36.158): icmp_seq=9 ttl=57 time=26.8 ms
64 bytes from f1.www.vip.sp1.yahoo.com (209.131.36.158): icmp_seq=10 ttl=57 time=32.2 ms
--- www-real.wa1.b.yahoo.com ping statistics ---
10 packets transmitted, 10 received, 0% packet loss, time 13049ms
rtt min/avg/max/mdev = 20.894/26.877/39.573/5.244 ms
yum update
cd /etc/sysconfig/network-scripts
nano ifcfg-eth0
nano is a wysiwig editor where you can use the arrow keys to move around. Make the following edits so that the ifcfg-eth0 file looks like this (Note: you should not change the HWADDR):
# Advanced Micro Devices [AMD] 79c970 [PCnet32 LANCE]
DEVICE=eth0
HWADDR=08:00:27:fd:ae:83
ONBOOT=yes
#BOOTPROTO=dhcp
BOOTPROTO=static
IPADDR=10.0.0.3
TYPE=Ethernet
When you're done with these edits, type Ctrl-o to save out the changes, and ctrl-x to exit.
Now you need to shutdown your Centos VM, in order to reconfigure the Guest VM networking.
shutdown -h now
When the VM is shutdown, Virtualbox will allow you to modify the Settings. Click the Settings button to open the Settings dialog again, and then click the Network menu, so you can modify Adapter 1, which is associated with eth0.
Modify the Attached To: and change this from NAT to Bridged Adapter. Once you've changed this, the name: drop down will appear and you'll be able to specify the XP network adapter to bridge to, which we'll change to be the Microsoft Loopback Adapter. If you recall, we previously configured the loopback adapter so that it has a 10.0.0.2 IP. The configuration should look like this:
Once Centos reboots, verify that the eth0 settings are now in place:
ifconfig eth0
[root@localhost ~]# ifconfig eth0
eth0 Link encap:Ethernet HWaddr 08:00:27:FD:AE:83
inet addr:10.0.0.3 Bcast:10.255.255.255 Mask:255.0.0.0
inet6 addr: fe80::a00:27ff:fefd:ae83/64 Scope:Link
UP BROADCAST RUNNING MULTICAST MTU:1500 Metric:1
RX packets:61 errors:0 dropped:0 overruns:0 frame:0
TX packets:115 errors:0 dropped:0 overruns:0 carrier:0
collisions:0 txqueuelen:1000
RX bytes:6961 (6.7 KiB) TX bytes:17422 (17.0 KiB)
Interrupt:11 Base address:0xc020
Now we should be able to use putty to ssh into our Centos server from windows using Putty. Start putty and put in 10.0.0.3 as the host address. It's probably a good idea to give the Session a name and save it so that you don't have to type in the 10.0.0.3 address every time you want to connect.
The first time you connect with Putty, you'll be prompted to save the ssh key for the server. Accept this so you won't be prompted in the future.
Login as root and you'll have full control of the server. Another helpful windows program is winscp, which you can use to move files back and forth between windows and your centos server.
Installing Apache, MySQL and PHP
We'll use the yum package manager to install the packages I typically use on a lamp development server.
*NOTE: Check out part 2 of this series if you want a recent version of PHP and MySQL!*
yum install httpd
yum install mysql
yum install mysql-server
yum install php
yum install php-mysql php-pdo php-pear php-gd
After installing these packages, we should be able to start apache and mysql, and verify that our php configuration is working.
service mysql start
The first time you start mysql, the package will do some initialization and provide you information on how to set the root mysql user password.
[root@localhost ~]# service mysqld start
Initializing MySQL database: Installing MySQL system tables...
OK
Filling help tables...
OK
To start mysqld at boot time you have to copy
support-files/mysql.server to the right place for your system
PLEASE REMEMBER TO SET A PASSWORD FOR THE MySQL root USER !
To do so, start the server, then issue the following commands:
/usr/bin/mysqladmin -u root password 'new-password'
/usr/bin/mysqladmin -u root -h localhost password 'new-password'
See the manual for more instructions.
You can start the MySQL daemon with:
cd /usr ; /usr/bin/mysqld_safe &
You can test the MySQL daemon with mysql-test-run.pl
cd mysql-test ; perl mysql-test-run.pl
Please report any problems with the /usr/bin/mysqlbug script!
The latest information about MySQL is available on the web at
http://www.mysql.com
Support MySQL by buying support/licenses at http://shop.mysql.com
[ OK ]
Starting MySQL: [ OK ]
[root@localhost ~]#
Now start Apache.
service httpd start
[root@localhost ~]# service httpd start
Starting httpd: httpd: Could not reliably determine the server's fully qualified domain name, using 127.0.0.1 for ServerName
[ OK ]
To conclude, let's add a simple phpinfo.php page and connect to it from a browser on windows.
cd /var/www/html
nano phpinfo.php
When nano opens type this php script, and save the file using ctrl-o to write it out, and ctrl-x to exit.
Open your browser of choice on your workstation, and point the url to http://10.0.0.3/phpinfo.php. You should be able to run the script and verify your php configuration.
In the next article, I'll outline further refinements to the setup, including configuring an apache vhost, adding to the hosts file under windows so that you can use domain names instead of IP addresses, and updating to newer versions of php and mysql, as well as the helpful php xdebug extension.
*Part II of the series here*
Comments
Display comments as Linear | Threaded
Joseph Melnick on :
To make this much more useful php should be updated to 5.2x or 5.3. I found the tutorial on this site useful.
Joseph Melnick
JM Web Consultants
Toronto, ON, Canada
Kunal Sagar on :
Kunal Sagar
Future Web Systems,
Mumbai, India
[email protected] on :
kavita Rao on :
kav rao on :
I followed the instructions. After changing the eth0 to 10.0.0.4, I am unable to putt to that ipaddr. Also same with checking phpinfo.
David on :
On the virtualbox side make sure the network adapter is set to bridged and is pointing to the loopback adapter.
Also make sure that the iptables service is not running inside the vm.
You may need to reboot if any of these things are not correct, and you have to change settings. Inside the vm you can always try service network restart, but this doesn't always work, so you may have to shutdown -h now the vm, and restart it. I have also seen cases where windows networking gets screwed up to the point that you have to restart windows.
John Bernhardt on :
I did have a problem connecting to the loopback until I found a video on youtube for a tutorial on Microsoft Loopback. I ended up shutting down CentOS, opened Loopback properties in Windows XP Network Connections and turned off Client for Microsoft Networks and File and Printer Sharing. Then I opened the Internet Protocol Properties Changed the Ip Address to 10.10.10.2, the subnet mask to 255.255.255.0 and the Primary DNS Server to 10.10.10.1. I hit the Advanced button, clicked on the WINS tab clicked on Disable NetBIOS over TCP/IP. Hit all the OK buttons and just to be sure I restarted Windows again. I restarted the CentOS, I opened ifcfg-ethO in nano, and changed the ip address to 10.10.10.3 and when I restarted CentOS again everything worked. At least for me...so far...
One more thing that took me awhile as a noob with this tutorial is the line under "After installing these packages, we should be able to start apache and mysql, and verify that our php configuration is working." I believe should read "mysqld" instead of "mysql"
Thanks again and I'll be moving onto Part II now!